|
|
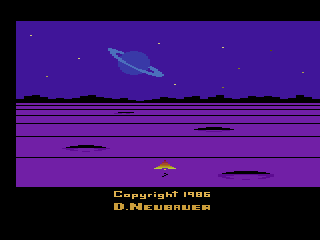
Solaris
|
Name:
|
Solaris |
|
| Company: |
Atari |
|
Model #:
|
CX-26136 |
|
Programmer:
|
Doug Neubauer |
| Year: |
1986 |
|
Released?
|
Yes
|
|
Notes:
|
Originally called
Universe then The
Last Starfighter
|
Often cited as one of the best Atari 2600 games ever in terms
of graphics and gameplay, Solaris is a masterpiece of fierce
shooting action with a healthy dose of strategy thrown in.
Unbeknownst to most people, Solaris actually started out
as a game called Universe (as noted in the source code), but was
quickly renamed The
Last Starfighter when Atari needed a game based on the new
movie. Why Solaris was choosen to become TLSF is unknown,
but Tod Frye was working on an official version which he quickly
abandoned. Atari may have wanted Tod to work on other
higher priority projects, and by slapping The Last Starfighter
name on a generic space themed game they were kill two birds
with one stone (Atari got their game and Tod was now free to
work on other things). However, as crafty as Atari was in
rushing TLSF out the door, it was never released due to the
crash of 1984. It wasn't until Atari Corp. (not Atari
Inc.) decided to revive the 2600 in 1986 that Solaris was
finally released (minus the Last Starfighter license).
The Zylons are back, and it's your job to wipe them out once and
for all. But this is a hush-hush mission since if the Zylons were
to figure out you're on to them you'd be vaporized on the spot.
So the official report says you're out to find the legendary
lost planet of Solaris and rescue the Atarian Federation
Pioneers. However if the Zylons get there first they'll
obliterate the Solaris and all the colonists. So buckle up,
strap in, and fire up those hyperwarp engines. It's a mad
dash to Solaris.
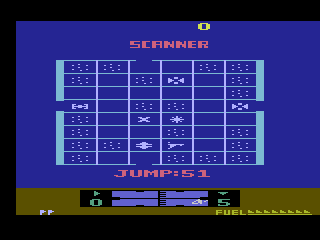
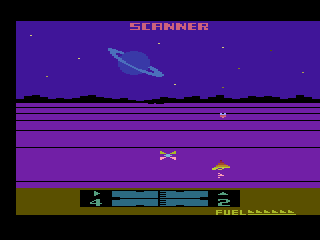
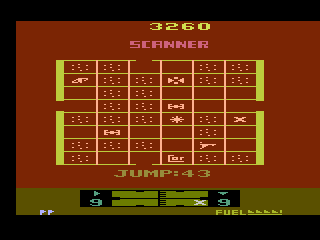
After taking off from your home base, you'll be presented with a
map of the current galaxy (16 total galaxies with 48 sectors
each!). Your top of the line scanner (made in Japan) is able
to track the movements of all enemy forces, along with showing you
the location of all the planets, corridors, star clusters,
wormholes and exits in the current galaxy. Your scanner also
displays a Jump value at the bottom of the screen which constantly
counts down. This jump value is really a timer which governs
when the Zylon forces and wormholes move. When the Jump
timer reaches zero, all the enemies will move to adjacent sector.
The Jump timer also determines how long you have to save a
planet that is under attack (more on this later). Also
represented on the scanner is your ships current location
(represented by an X) and your currently selected destination
(represented by a flashing X). By moving the X cursor and
pressing the fire button, you can plot a course and hyperwarp to
the selected location.
Jumping through hyperspace ain't like dusting
crops, boy!
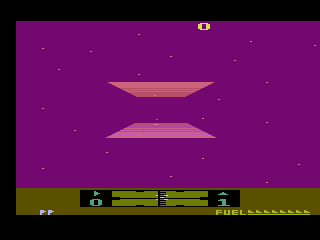
Traveling through hyperspace can be a wee bit
tricky in Solaris. As soon as you've selected your desired
destination and pushed the fire button you'll be taken back to the
main screen and a small countdown will begin. As your ship
builds up more and more power for the hyperspace jump you'll
notice it begin to split into two images, it is imperative that
you try and keep these two images lined up as much as possible
(this is called keeping your ship in focus). The number on
the right-hand side of your scanner indicates your current focus
value (0 is perfect, 3 is terrible), by keeping the focus value
near or at zero you can reduce the amount of fuel used when
hyperwarping. Try and master keeping your ship in focus, as
it may save your life some day.
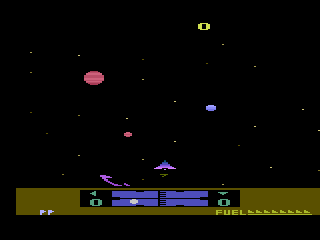
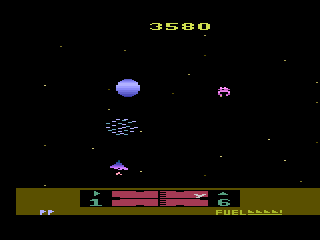
Now's as good a time as any to talk about your main
console display. At the bottom of the main screen you'll see
a strange grid with some constantly changing numbers on either
side, this is your radar screen. The radar grid in the
middle shows you where enemy ships are in the immediate vicinity
of your vessel, while the numbers on either side show the
left/right (left hand numbers) and up/down (right hand numbers)
distance of other enemy ships. Using these numbers to track
down the enemy can be tricky, but sometimes it's necessary when an
enemy doesn't want to be found. If your radar screen is
flashing all kinds of weird colors it means its been knocked
offline by and enemy shot, make sure your land and repair it ASAP!
Also displayed on the main console are your remaining lives
(shown in the bottom left hand corner) and your fuel (shown on the
bottom right). Make sure you watch your fuel constantly, as
if it runs out your ship is toast! A warning sound will let
you know you when your fuel is low (the fuel gauge will flash as
well), use this opportunity to land on the nearest planet and
refuel.
There are two types of planets in Solaris (not
counting Solaris itself): Federation planets, and Zylon planets.
Federation planets are the asterix shaped symbols on your
map and provide a safe place to refuel and repair your ship.
Once you've landed on a Federation planet, slow down (pull
back n the joystick) and search the planet for the docking bay
using your radar. Docking bays resemble giant VCR's, and you
must carefully fly into the center of them to refuel (only one
docking bay per planet). Destroying the docking bay will
result in the destruction of the planet itself so be careful not
to fire around them. If the planet you've landed on is
currently under attack you'll be greeted by Gliders and Raiders
instead of the normal planet inhabitants. To save a planet
that is being invaded you must destroy all the enemies on the
planet before the Jump timer counts down to zero. If the
planet is not saved it will destruct and create a red zone (more
on this later), but if you've saved the invaded planet you can
refuel as normal.
Zylon Planets resemble ball with a ring around it,
and are your chance to snag an extra life. As you've
probably guessed, Zylon planets are infested with, what else,
Zylons! However hidden amongst the Zylon hordes are three
stranded space cadets. By rescuing all the stranded cadets
you can gain an extra life (and destroy the offending planet),
however if you miss a cadet the planet will simply self-destruct
but will not turn into a red zone. Red zones occur when a
Federation planet in the sector has been destroyed (either by
Zylon forces or your own stupidity). Red zones cause the
entire galaxy to fill with deadly red radiation (exactly what were
those Federation guys doing on that planet?) for an indefinite
period of time. This radiation will cause your ships control
to malfunction and reverse themselves! Obviously this makes
fighting the enemy much more difficult as they aren't affected by
the radiation at all. Try and get out of the affected galaxy
as soon as possible. Rumor has it that the lost planet of
Solaris is located in the center of a giant red zone.
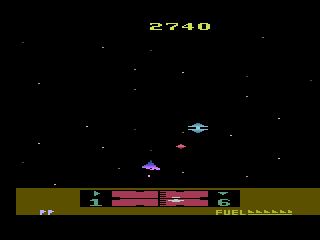
The Zylon armada is comprised of several types of
ships, each with its own personality and attack method.
Thankfully your scanner is able to determine what type of
enemy is currently in the sector so you can plan accordingly (i.e.
avoid the tough guys!).
|
Kogalon Star Pirates
|
|
These guys are on nobodys side, as they
attack both you and the Zylon ships. However don't
count on them defending you from a Zylon horde, they seem
to hate you more than the Zylons. Watch out they
don't run into you with their occasional suicide runs. |
|
Mechnoids
|
|
These quick moving little guys just love
to dart in and out avoiding your shots. They may
start out easy, but as the battle progresses they move
faster and faster. Make sure you don't underestimate
them. |
|
Flag Ships
|
|
Star Raiders veterans may recognize these
lumbering behemoths from the old days. Flag Ships
are big and clumsy, but make up for this by shooting out
loads of Distractors. Flag Ships have no weapons,
but they have a bad tendency to run into your ship so be
careful. |
|
Distractors
|
|
Distractors are the only type of ship you
can safely run into, this is a good thing since they're
fast and suicidal. However each time a Distractor
rams your ship it will rob you of some fuel so try and
avoid them and take out the Flag Ship ASAP. |
|
Cobra Ships
|
|
These are the deadliest enemies in the
whole game. Cobra Ships are fast, smart, and can
quickly avoid your shots. Taking on a whole fleet of
them is near suicide, but with a little planning (and lots
of luck) you'll come out on top. Try and avoid these
guys whenever possible. |
|
Attack Groups
|
|
Attack Groups appear on the map as a large
star cruiser. Each Attack Group consists of a few
Flag Ships, Mechanoids, and Pirates. This mixture
can be deadly, so take extreme caution. Thankfully Cobra
Ships do not appear in Attack Groups. |
| Blockaders |
|
Blockaders are really spinning space mines
that block certain exits on the map. Blockaders
appear in swarms and quickly move in all directions trying
to ram your ship. Touching a Blockader is instant
death so try and keep to one side of the screen when
weaving through one of their swarms. |
| Gliders |
|
Gliders appear on planet surfaces and
appear to glide across the screen as they shoot at you
(hence their names). However Gliders have a
predictable pattern and with a little practice can be
easily dealt with. |
| Raiders |
|
Raiders appear with Gliders on planet
surfaces, but are a little more erratic in their movement. |
| Targeters |
|
Targeters appear on some planet surfaces,
and as their name suggests, they like to come right at
you. It's shoot or be rammed when it comes to
tackling Targeters. |
| Guardians |
|
Guardians only appear in Corridors,
guarding the key to the Ion Gate. Guardians are
stationary and will not fire at your ship unless you fire
at them first. However your ship can still be
destroyed by colliding with a Guardian so take care not to
underestimate them. |
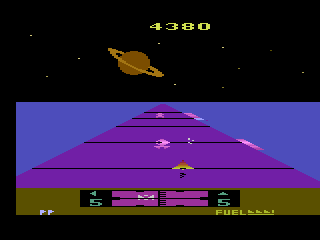
As you make your way to Solaris, you'll undoubtedly
run into two of the galaxies most annoying natural phenomenons:
Corridors and Wormholes. Corridors are long dangerous
tunnels that connect two galaxy sectors. Traveling through a
corridor is tricky at best and will most likely cost you a few
lives in the process. Once you've plotted a course into a
corridor you'll appear to be on a planet with several Zylon
forces, ignore them for the time being and make your way to the
docking bay. Once entered, the docking bay will take you to
the actual corridor screen which is really a long tunnel full of
Guardians. Your ship must travel at full speed to
successfully make it through the corridor so be careful not to run
into any of the stationary Guardians (or their shots). As
you approach the end of the corridor you'll see a glowing Ion Gate
and a key, make sure you grab the key before you smash into the
gate or you'll loose a life. Since you're traveling at top
speed, grabbing the key can be tricky. Once you've made it
through the Ion Gate, the corridor will self-destruct and you'll
appear on the other side.
Wormholes are tricky beasts. Entering a
wormhole will cause your ship to do a double warp (one right after
the other) and you'll appear on the other side. Using
wormholes you can jump to the other side of star clusters,
enabling you to get to areas that you normally couldn't reach.
Unlike other celestial bodies, wormholes move with the Jump
counter, so be patient and jump into a wormhole only when it's in
the proper position. Careful use of wormholes are the only
way to make it to legendary planet of Solaris.
Solaris is an amazingly deep and challenging 2600
game which somehow manages to keep its gameplay simple enough to
remain fun (no need to keep pulling out the manual). Solaris
pushes the 2600 to its utmost limits, taking it far beyond where
the original creators thought it could go (take a quick look at
Combat and then take another look at Solaris). Although most
players will never complete the game (Solaris is one of the few
2600 games that actually does have an ending), Solaris remains
entertaining without becoming overly frustrating.
| Version |
Cart Text |
Description |
| ?????? |
Solaris Pre-Release |
Very close to final
|
Return
to 2600 Software
|